Getting started
 What’s New
 Roadmap
 Octeth Training Program
Installation & Setup
 Requirements
 Architecture
 Server Setup
 Oempro Installation
 Community Edition Install
 SSL Certificates
 Version Upgrade
 Troubleshooting
Video Tutorials
 Video Tutorials
Administration
 Quick Walkthrough
 Security
 Sub Admin Accounts
 Settings
 Delivery Servers
 Global Segments
 Global Custom Fields
 Bounce Processing
 Spam Complaints
 Suppression List
 Plug-Ins
 Delivery Report
 User Management
 Maintenance
Audience Management
 Introduction
 Subscriber Lists
 Custom Fields
 Segments
 Subscribers
 Webhooks
 Website Event Tracking
Email Marketing
 Introduction
 Auto Responders
 Email Campaigns
 Sender Domain Man.
 Journeys (Automation)
 Bounce Processing
 Email Personalization
 FBL Processing
 Email Builder Integrations
 Email Deliverability
 Sender Domain Management
Plug-Ins & Add-Ons
 AI Plug-In
 RSS Plug-In
 Bounce Catcher Add-On
 Link Proxy Add-On
Developers
 Introduction
 Single Sign On
 API
API Plug-In Development
 Database
Advanced
 Reverse Proxy
 Cookbook
Help
 Troubleshooting
 Contact Us
Email Personalization
Personalized emails stand out within the inbox as highly relevant, tailor-made material. Personalized emails make an email more likely to be opened and clicked on, and most importantly, personalized emails strengthen customer experiences by sending the right content to the right people at the right time.
when creating an email campaign or auto responder email, you can personlize following email parameters:
- Email subject
- HTML email body
- Plain text email body
Email Subject Personalization
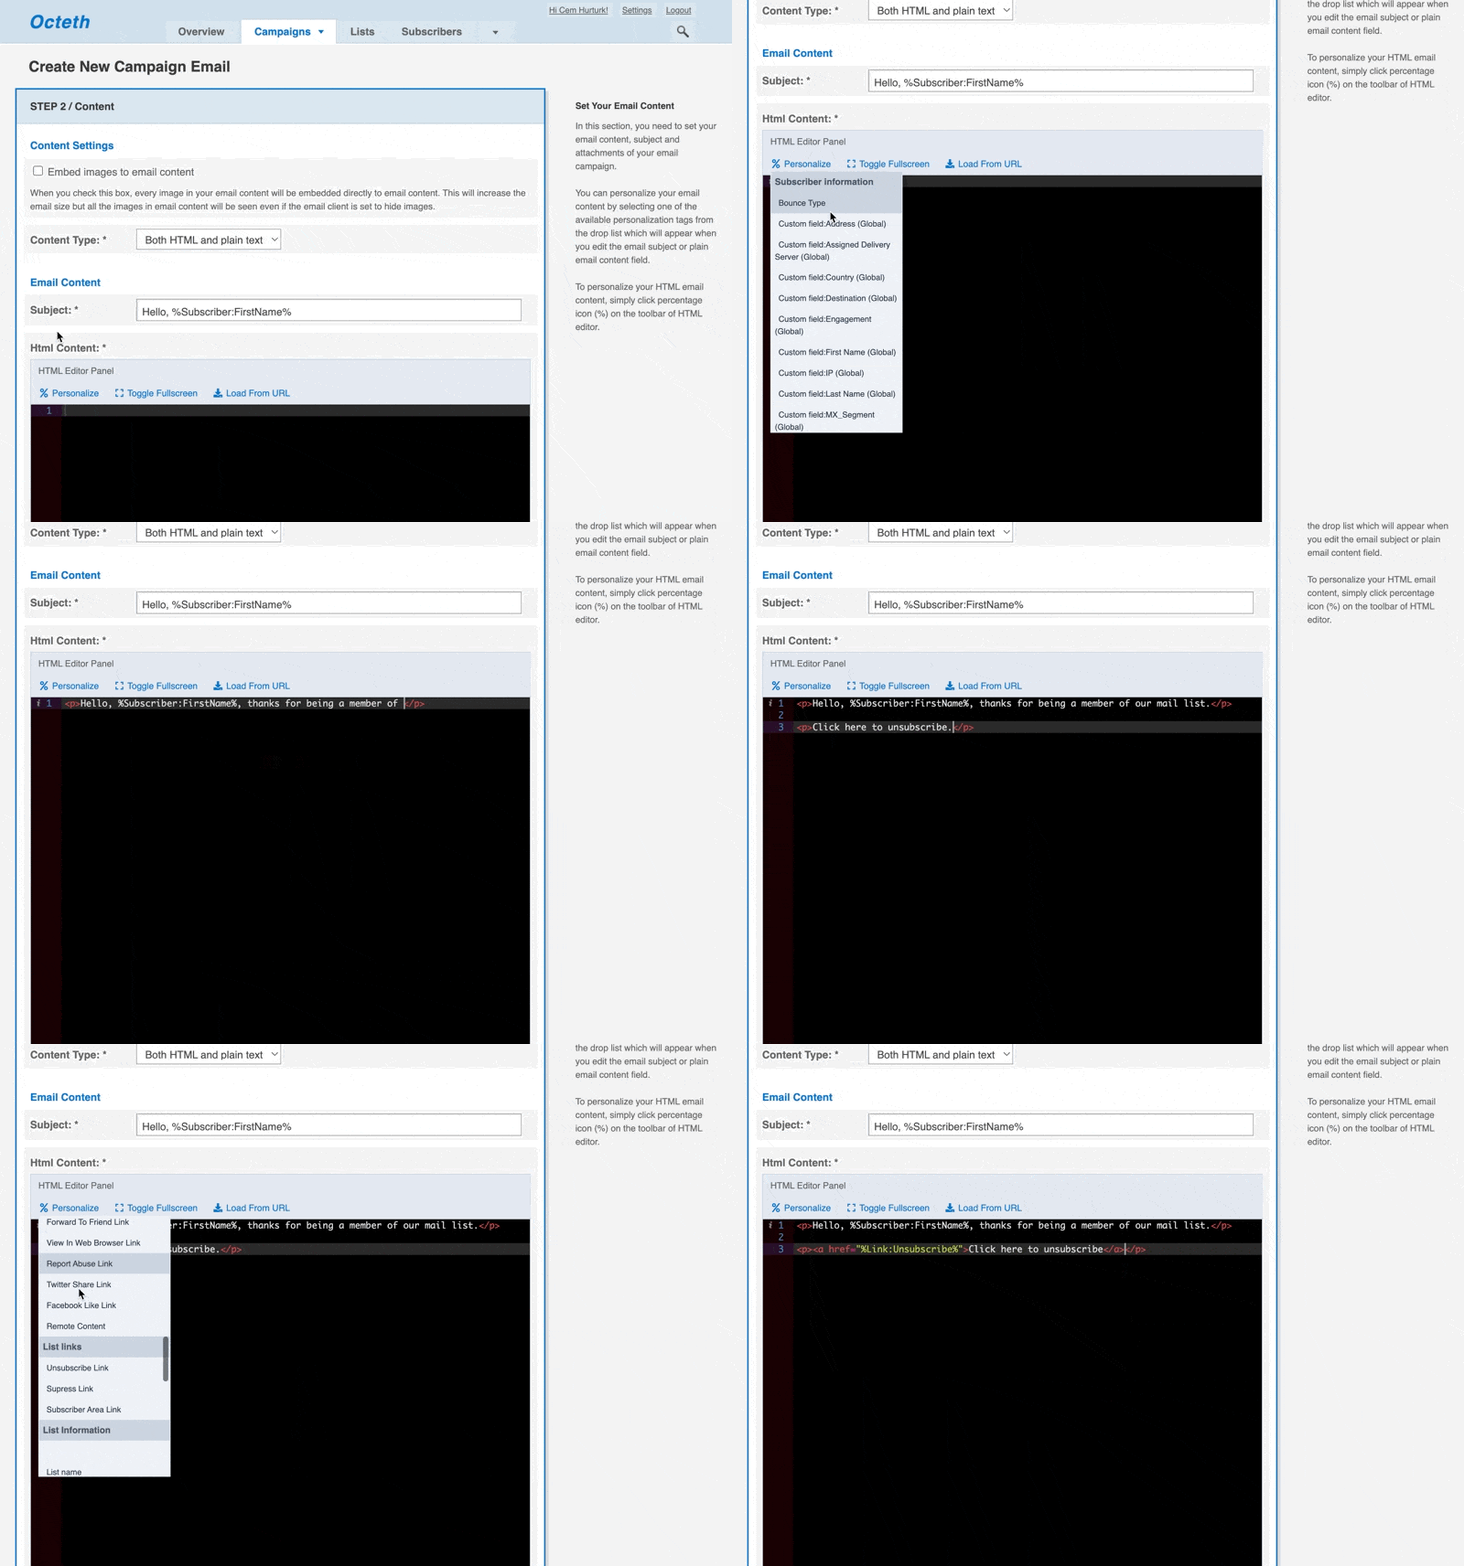
When you click on the email subject, a personalization drop down will appear below the subject line:

HTML Email Content Personalization
In order to personalize the HTML content, simply click “Personalize” menu item on the toolbar and click the attribute you would like to insert:

Plain Text Personalization
Once you convert your HTML email content into plain text version with a single click, you can click on the plain text email editor and the personalization drop down list will be displayed below the text editor:

Stripo Drag-n-Drop Email Personalization
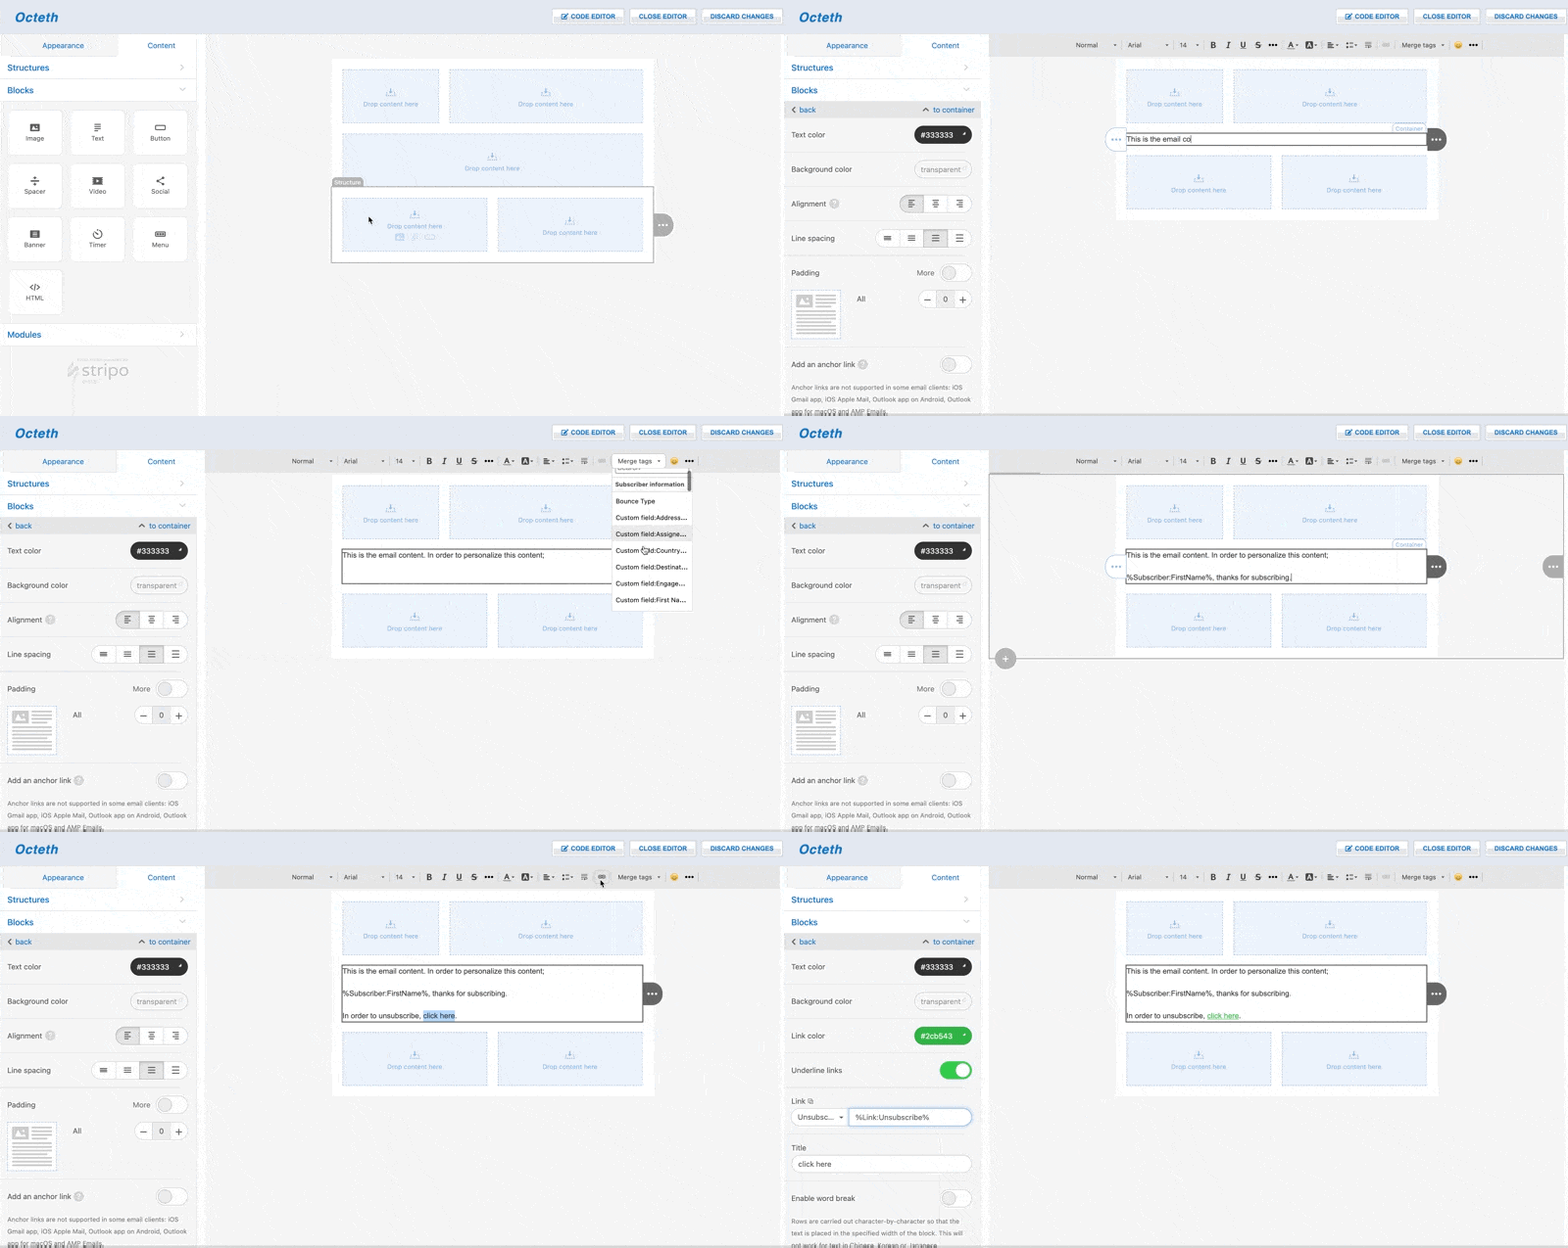
When creating your email in Oempro using the Stripo drag-n-drop email builder, click “Merge Tags” to insert subscriber attribures, special merge tags or links into the email:

Special Merge Tags
In addition to subscriber attributes, you can personalize the email content and subject with the following special merge tags:
%Date=...% | Inserts the date and time of the delivery. This date/time will be different for each recipient because it gets rendered just before the delivery for each recipient. For date format, please refer to PHP date format list. Example:
%Date=F jS, Y% → May 2nd, 2022 |
%Random:Letters|Numbers|Alpha:Length% | You can insert randomized letters, numbers, alpha numeric characters into the email content. Example:
%Random:Letters:5% → adjwo
%Random:Numbers:5% → 29489
%Random:Alpha:5% → a92K3 |
%Random:FirstName% | Octeth has 100+ first names defined. One of these first names will be randomly picked and inserted into the email content (or subject). |
%Random:LastName% | Octeth has 100+ last names defined. One of these last names will be randomly picked and inserted into the email content (or subject). |
%MFROMDomain% | This merge tag will be replaced with the MAIL FROM email address domain. |
[[var1|var2|var3|varn]] | Content spinning feature is a very helpful feature and it helps you to make the email content unique for each recipient.
Here’s an example;
[[Hello|Hi|Hey]] %Subscriber:FirstName%,
During the delivery, Octeth will pick a randomly picked variation from “Hello”, “Hi”, “Hey” variations. |
Special Links
You can also insert some system links into the email content:
%Link:Forward% | This tag is replaced with a link to the forward to friend page. Recipients can enter their friends names and a copy of the email will be delivered to them.
(*) This tag will be deprecated in future version releases! |
%Link:WebBrowser% | This tag is replaced with a link to the web browser version of the received email. |
%Link:ReportAbuse% | This tag is replaced with a link to the report abuse page. Recipients can file a spam complaint on this page. |
%Link:SocialShare:Twitter% | This tag is replaced with a Twitter Share link.
(*) This tag will be deprecated in future version releases! |
%Link:SocialShare:Facebook% | This tag is replaced with a Facebook Like link.
(*) This tag will be deprecated in future version releases! |
%Link:Unsubscribe% | This tag is replaced with an unsubscription link. When a recipient clicks on this link, she gets unsubscribed immediately from the corresponding list. |
%Link:Suppression% | This tag is replaced with an unsubscription link. When a recipient clicks on this link, the recipient email address is added to the global suppression list first and then unsubscribed from the corresponding list. |
%Link:SubscriberArea% | This tag is replaced with a link to the subscriber area where recipient can manage her subscription preferences. |
%RemoteContent=http://% | This merge tag allows the user to add dynamic remote content into the email body or subject from a third party URL. It’s a very useful and powerful feature to fetch remote content from your content pool based on recipient information. Example;
%RemoteContent=http://mywebsite.com/content/%Date=Ymd%.html%
This merge tag will fetch the content from `http://mywebsite.com/content/20220302.html if the email is sent on May 2nd, 2022. |
{{ var }} | HTML encoded by default |
{{{ var }}} | Raw output without HTML encoding |
{{urlEncode var}} | URL encoded output |
{{uppercase var}} | Uppercase output |
{{lowercase var}} | Lowercase output |
{{camelcase var}} | Camelcase output |
{{capitalize var}} | Capitalize output |
{{capitalizeAll var}} | Capitalize all words in output |
{{dashcase var}} | Dashcase output |
{{dotcase var}} | Dotcase output |
{{downcase var}} | Downcase output |
{{ellipsis var}} | Truncate output to 20 characters with ellipsis |
{{ellipsis-xxx var}} | Truncate output to xxx characters with ellipsis |
{{pascalcase var}} | Pascalcase output |
{{raw var}} | Raw output without HTML encoding |
{{snakecase var}} | Snakecase output |
{{titleize var}} | Titleize output |
{{trim var}} | Trim output |
{{trimLeft var}} | Trim left output |
{{trimRight var}} | Trim right output |
{{truncate var}} | Truncate output to 20 characters |
{{truncate-xxx var}} | Truncate output to xxx characters |
{{truncateWords var}} | Truncate output to 5 words |
{{truncateWords-xxx var}} | Truncate output to xxx words |
{{upcase var}} | Uppercase output |
{{encodeURI var}} | URL encode output |
{{decodeURI var}} | URL decode output |
Journey Send Email and Email Gateway Event Personalization
Journey’s send email actions and email gateway emails can be personalized with event properties. Here’s an example
{{ Event:name }}
{{ Event:Property:event-property-name }}
Conditional Personalization
Starting from Oempro v5.0.0 version, we have introduced a brand new personalization engine and email content tags. We will remain our legacy personalization engine until Oempro v6 version release.
This new personalization engine introduces new syntax. From now on, instead of %...% syntax, the brand new {{ ... }} syntax will be used.
Here’s an example:
{{ Subscriber:EmailAddress }} will be replaced with the email address of the recipient.
In addition to standard personalization, our new personalization engine includes powerful conditional personalization.
Whitespace
Whitespace before or after the delimeters is allowed, however, in certain cases, whitespace within the tag is prohibited (explained in the following sections).
Some valid examples:
{{name }}
{{name }}
{{name}}
{{name  }}
{{
name
}}
Some invalid examples:
{{na me }}
{ {name} }
Comments
You can add comments to your templates by wrapping the text in {{# #}}.
Example
{{#This will not be parsed or shown in the resulting HTML #}}

{{#
They can be multi-line too.
#}}
Prevent Parsing
You can prevent the parser from parsing blocks of code by wrapping it in {{ noparse }}{{ /noparse }} tags.
Example
{{noparse }}
    Hello, {{name }}!
{{/noparse }}
Basic Example:
{{#Parsed: Hello, World! #}}
Hello, {{name }}!

{{#Parsed: <h1>Oempro is Awesome!</h1> #}}
<h1>{{title }}</h1>

{{#Parsed: My real name is Oempro User!</h1> #}}
My real name is {{Subscriber:FirstName }} {{Subscriber:LastName }}
Conditionals
Conditionals in Oempro are simple and easy to use. It allows for the standard if, elseif, and else but it also adds unless and elseunless.
The unless and elseunless are the EXACT same as using {{ if ! (expression) }} and {{ elseif ! (expression) }} respectively. They are added as a nicer, more understandable syntax.
All if blocks must be closed with the {{ endif }} tag.
Variables inside of if Conditionals, do not, and should not, use the Tag delimeters (it will cause wierd issues with your output).
A Conditional can contain any Comparison Operators (==, !=, ===, !==, >, <, <=, >=). You can also use any of the Logical Operators (!, not, ||, &&, and, or).
Examples
The not Operator
The not operator is equivilent to using the ! operator. They are completely interchangable (in-fact not is translated to ! prior to compilation).
Undefined Variables in Conditionals
Undefined variables in conditionals are evaluated to null. This means you can do things like {{ if foo }} and not have to worry if the variable is defined or not.
Checking if a Variable Exists
To check if a variable exists in a conditional, you use the exists keyword.
Examples
{{if exists Subscriber:CustomField100 }}
    Foo Exists
{{elseif not exists Subscriber:CustomField100 }}
    Foo Does Not Exist
{{endif }}
You can also combine it with other conditions:
{{if exists Subscriber:CustomField100 and Subscriber:CustomField100 !== 'test' }}
    Something here
{{endif }}
The expression exists foo evaluates to either true or false. Therefore something like this works as well:
{{if exists Subscriber:CustomField100 == false }}
{{endif }}
JSON Custom Fields
If the subscriber custom field value is a JSON data, the personalization engine can detect this and you can personalize your email content with any values inside the custom field.
For example, if the custom field value is:
{"key1":"val1","key2":"val2","key3":"val3"}
You can personalize your email content with any of these values:
{{Subscriber:CustomFieldXXX:key2 }}On this page
- Email Personalization
- Email Subject Personalization
- HTML Email Content Personalization
- Plain Text Personalization
- Stripo Drag-n-Drop Email Personalization
- Special Merge Tags
- Special Links
- Journey Send Email and Email Gateway Event Personalization
- Conditional Personalization
- Whitespace
- Comments
- Prevent Parsing
- Conditionals
- The not Operator
- Undefined Variables in Conditionals
- Checking if a Variable Exists
- JSON Custom Fields

